Guides & FAQ
FAQ
Share Data with Partner / Other User
To sync data and share data with multiple users, you need to share a Google account. This ensures privacy when sharing financial data. Since Cashew supports syncing of data with a Google account, a shared Google account will share data between multiple Cashew apps that use the same account.
- Share a Google account with the users you want to sync with.
- Use the syncing feature in the app to keep data up-to-date across all users.
Currently, Cashew does not support other methods of syncing due to privacy concerns and the complexity involved. As Cashew does not collect/store any of your financial data on a central server, it is not possible to support any other type of data sharing (see the Privacy Policy).
Syncing Troubleshooting
If you're experiencing syncing issues between devices; consider the following:
Ensure you are using the latest version of Cashew on all devices. Syncing has recently been overhauled to improve reliability and speed. Syncing with application version 6.x.x+ is not compatible with older versions (5.x.x and lower). The app version is displayed in the More, About Cashew page.
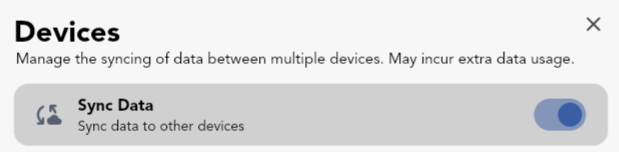
Make sure you are logged in to Google Drive with the same account on all devices. Also ensure syncing between devices is enabled. Head to More, Login / Backup, login if needed, and tap the Sync/Devices button. Here, Sync Data can be toggled.
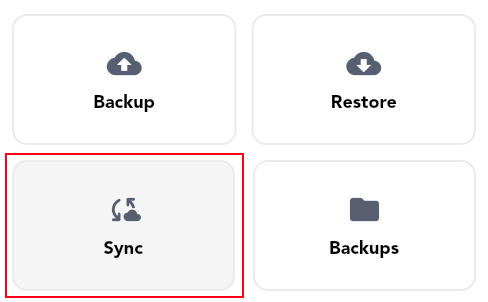
The Syncing Process
Syncing involves two steps: upload and download. Both steps must occur for changes to reflect across platforms. This allows you to safely sync using your personal Google Drive, eliminating the need for a centralized server and ensuring your data is not shared with us or any third party.
You can force a sync by:
- Swiping down on the homepage
- Launching the app fresh, if the user was previously logged in
Each device needs to upload changes before they can be downloaded to another device. Therefore, you will need to first sync from one device to upload changes, and then sync on the target to download changes.
Note: auto login is not supported on the web app. This is a limitation imposed by Google. You will need to be sign-in manually each time to ensure syncing is properly executed.
Resetting Syncing
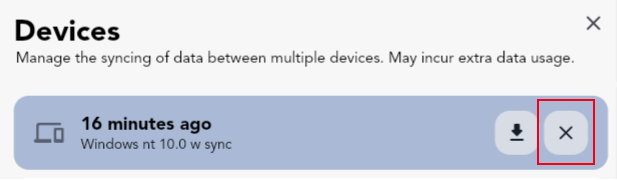
To reset syncing you, head to More, Login / Backup, login if needed, and tap the Sync/Devices button. Here you can tap Reset Sync to delete the sync database. Note: This will not delete any local data that has already been synced to the current device. After resetting, you can Sync Now to upload the current local data that other devices can sync to.
Prevent Resyncing When Restoring a Backup
To prevent data from being downloaded and synced right after a backup is restored (cloud or local): open the Sync/Devices page in More, Account and remove the sync database by using Reset Sync. This will ensure that after restoring a backup, data from other devices will not be restored. After this has been reset, the backup can be restored without other data being brought in, since there is no longer any cloud sync data to download when the backup is loaded.
Alternatively, Cashew now prompts the user if they have syncing enabled and a backup has just been restored. At this point, the user can immediately disable syncing to prevent syncing with remote shared device data.
Tracking Credit Card Spending
Tracking Credit Spending
Create a separate account specifically for tracking credit card spending. Every time you make a purchase using that credit card, you would add a transaction to that account. You can transfer amounts between accounts for credit card payments or apply a Balance Correction.
Credit Card Statement
In the "Account Details" page (tapping the account twice on the homepage account switcher sections), set the cycle time range for reports to reflect the spending from your credit card statement.
Utilize the All Spending Summary page to view past spending ranges associated with your credit card account. You can apply filters to only select that account.
Credit Card Payments
You can transfer amounts between accounts for credit card payments or apply a Balance Correction. To support reminders, consider a repetitive transfer or set an upcoming transaction. When the transaction due date approaches, Cashew will send you a notification.
Since the amount of the payment may be unknown, you can set More, Settings & Customization, Transactions, Scheduled Transactions: Confirm Amount to "If transaction amount is 0". If you then create an upcoming repetitive transaction called "Credit Payment" and explicitly set the amount to 0 - you will be prompted to enter an amount when manually setting this transaction to "Paid". You can also disable automatic payments for overdue transactions, so you must manually mark it as "Paid" and enter a custom amount.
Credit Card Budget
Create a new budget with a set limit, and set the account to the respective credit card account. You can set the start date to the date of your statement so that the totals within the budget history will match that of your statement. Pay attention to the set period dates - this will repeat automatically for the set time range.

Transferring Funds Between Accounts
When a transfer is made, two Balance Correction transactions are created: an account transfer out and an account transfer in. Each is a separate transaction and can be edited individually at any time in the transactions list. The net total of a transfer is 0.
Note: you will need more than one account created within Cashew
Creating a Transfer
When there is more than one account created within Cashew, Cashew allows you to transfer funds. There are three primary ways of opening the transfer popup:
- A new Transfer tab will appear when creating a new transaction
- Long pressing the (+) button will allow you to transfer funds
- Editing an account will allow you to transfer funds
Repetitive Transfers
You can create a repetitive transfer by first adding a transfer transaction, then editing it to a 'repetitive' or 'upcoming' transaction type. Cashew will prompt you to change both transfer transactions and the transfer will behave as such.
Transferring Funds to Goals or Loans
After creating a transfer, it creates 2 transactions - a transfer in and a transfer out. You can edit these transactions and add the respective transfer in or transfer out transaction to any goal/loan. Alternatively, you can manually create a transaction with the Balance Correction category emulating a transfer.
Transfer Exchange Rate
To change the exchange rate for a transfer, tap the exchange rate factor on the Transfer Balance page. By default, it is the set exchange rate in the application between the 2 accounts (See Using Multiple Currencies).
Future Repetitive Transactions and Automatic Payments
To create a repetitive transaction, create a new transaction and select Repetitive or Subscription. To create a future non-repeating transaction, select Upcoming. To view more information about transaction types, tap the ( i ).
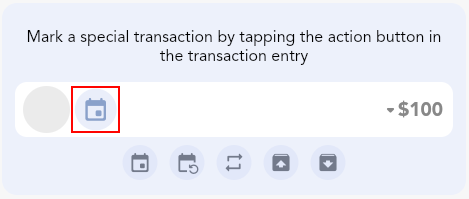
These types of transactions are not counted in totals unless marked as Paid. You can mark a transaction by tapping the action on the transaction entry once it has been added to your transactions list.
Overdue Transactions
By default, overdue transactions (when the current date is past the set transactions date) are automatically paid. You can change this behavior by heading to More, Settings & Customization, Transactions, Scheduled Transactions: Automatically Pay Transactions. You can press the action button in the transaction entry to mark it as paid immediately. Then it will create the next transaction in the cycle.
Repetitive Transaction Behavior
The next repetitive transaction in the sequence will only be created when you mark the current transaction (either as Paid or Skipped).
To create all future transactions, they will need to be marked as paid. By default they are marked as paid to the current date, not when the transaction is due. This can be changed by heading to More, Settings & Customization, Transactions, Scheduled Transactions: Paid Date set to Transaction Date. Now the upcoming repetitive transaction can be marked as paid and it will maintain its original due date, while creating the next in the sequence. These paid transactions will now count towards account and budget totals since it has been marked as paid.
Future Transaction Not Being Created
An upcoming transaction only creates its next future occurrence once. If the created future transaction was deleted, it won't automatically be recreated again. To force the transaction to create a new future transaction, you can change the upcoming transaction type to "Default" and then back to "Upcoming" / "Repetitive" / "Subscription" to ensure it will create the next transaction in the cycle when it is marked as "Paid" / "Skipped".
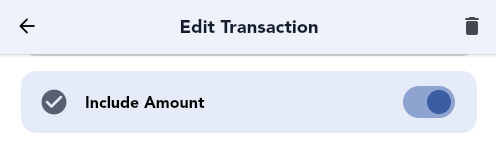
Excluding a Transaction Amount
To exclude a transaction amount from all totals but still keep a transaction entry, you can edit the transaction of interest, scroll down and select More Options and toggle Include Amount. This setting is only available for Default transaction types.
Add to a Budget, Goal, or Long-Term Loan Without Affecting Account Balance
To add to a budget, goal, or long-term loan without impacting your account balance, create a separate account dedicated to tracking your budget, goal, or long-term loan contribution transactions. Transactions added to this account will not affect other account balances. Once you create a transaction added to this extra account, you can organize it into your budget, goal or long-term loan of your choice.
You can customize the net worth to only include certain accounts and use account filters when analyzing spending statistics to exclude this separate "external" account.
Archiving Accounts, Budgets, Goals, and Long-Term Loans
To archive an account, category, budget, goal, or long-term loan you need to visit the edit data page for each. To visit the edit data page head to More, "Edit, Delete, and Reorder Data", Accounts/Categories/Budgets/Goals/Loans and tapping the 'Pencil' icon in the top right if needed. To archive, you can toggle the 'eye' icon. This will make the archived item 'hidden' in the UI.
Note: To remove a pinned account, budget, goal, or long-term loan on the homepage, you will need to edit the home page section separately.
Splitting a Transaction Across Multiple Categories
Cashew prioritizes efficient and straightforward transaction logging. If you need to divide a transaction among various categories, you can create separate transactions for each detail, enabling you to tailor your level of detail while maintaining a simple interface for all. Although it doesn't natively support splitting transactions across multiple categories, you have the freedom to log your spending as you see fit by adding individual transactions for each detail you wish to track.
Upgrading to Cashew Pro Lifetime from a Subscription
To upgrade to Cashew Pro Lifetime from a subscription you will need to cancel your current subscription. Data will not be lost/modified based on the status of the Cashew Pro subscription. Once the term ends, you will be able to purchase Cashew Pro Lifetime; or any other subscription option. This is to ensure each user gets the full term of Cashew Pro they have paid for.
Using Cashew Pro on Multiple Devices and Restoring Purchases
Each platform operates with its own billing system (iOS and Android), therefore it would need to be purchased separately on each platform. Every purchase of Cashew Pro supports the app's development.
A purchased Cashew Pro license can be shared between any number of devices using the same Apple ID Account through the App Store on iOS or can be shared between any number of devices using the same Google account through the Play Store on Android. A Cashew Pro license is linked to the account used on the Google Play or App Store, not to the account used within Cashew - keep this in mind if you are trying to restore a license purchase.
The web app does not support Cashew Pro.
Troubleshooting Restoring License Purchases on Android
A Cashew Pro license is linked to the Google Account used on the Google Play Store when the purchase was made. It is not necessarily related to the account used in the Cashew app. When restoring a purchase on a different device, please make sure you are logged into the same Google account in the Play Store that the purchase was made on for both devices and it is set as the primary account (the first account) on the Google Play Store.
Within the application you can tap 'restore purchases' to ping Google Services about your purchase. Again, ensure you are signed in to the correct Google Account on the Play Store and it is selected as your primary account on the Google Play Store, not within Cashew. The account within Cashew does not impact the restoring of a license purchase - it is only related to cloud backups. You may need to contact Google Play support to inquire about your purchase if it was not successfully processed.
Pro Tips
Customizing Navigation Pages
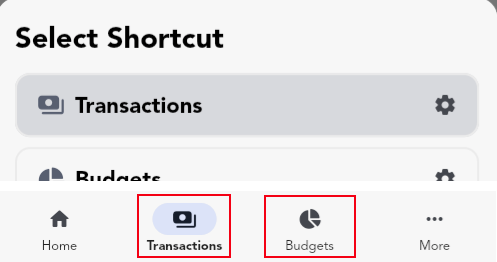
Bottom Tab Navigation
To customize the bottom navigation tabs, long press to bring up the Edit Navigation Tabs menu. Select a tab shortcut to change it to another page. You cannot change the last More tab.
The first tab selected will be the default launch page for Cashew. Bottom navigation tabs are displayed when in Mobile Portrait view.
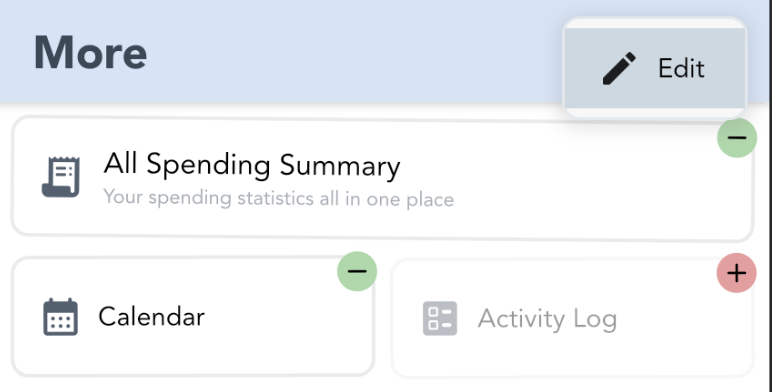
More Page Shortcuts
To customize the More page shortcuts, tap the three-dot menu in the upper-right corner and select "Edit". You can "long-press" drag and drop to rearrange shortcuts or tap each one to toggle enable/disable of that shortcut.
The More page is only available when in Mobile Portrait view.
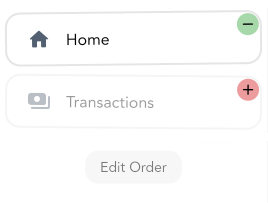
Side Tab Navigation
To customize the side navigation tabs, select Edit at the bottom of the list. You can "long-press" drag and drop to rearrange tabs or select each one to toggle enable/disable of that shortcut.
Side tab navigation is displayed when in Full Screen Landscape view.
Customize the Add Transaction Flow
Creating a transaction is the most common action in a budget expense tracker application. Cashew allows you to fully customize the prompts asked when creating a transaction and the user interface.
To view all customization settings, open the Add Transaction page by tapping the (+) action button in the bottom right corner. You will be immediately prompts for transaction information, however, this time dismiss the bottom sheet. On the Add Transaction page, tap the three-dot menu in the upper-right corner to get to the customization menu. These settings can also be found in the More > Settings & Customization page.
Custom Prompts
To edit the steps and information you are asked during the initial "Add Transaction" flow, (immediately after pressing the (+) button to add a transaction):
- Open the Add Transaction page by tapping the (+) action button in the bottom right corner
- Dismiss the bottom sheet asking for transaction information
- Tap the three-dot menu in the upper-right corner
- Select "Initial Input Prompts" to edit them
On this page, you can: change the order of / enable / disable the questions prompted when intiially creating a transaction. You can also customize certain steps by tapping on them to bring up more options.
Duplicating a Transaction to the Current Date and Time
When a transaction is selected you can duplicate the transaction (in the selected transaction top app bar). To duplicate the transactions to the current date and time, you can long press the duplicate option.
Long Press the (+) Button
After long pressing the (+) button in the bottom right corner on most pages, you will be presented with more options to 'Add' things apart from the default transaction.
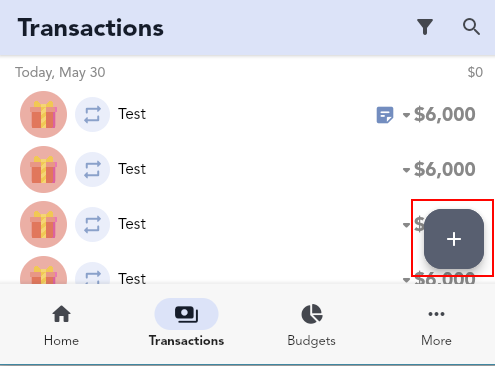
In the popup, you can easily create transfers between accounts or correct an accounts balance under the "Accounts" section. You can also duplicate pinned transactions by tapping the transaction chip under "Transactions".

Long Pressing to Edit
Most UI elements can be 'long pressed' (a press and hold) to edit or perform an extra action. For example, long pressing a category when selecting one during a 'Select Category' popup, will allow you to edit that category.
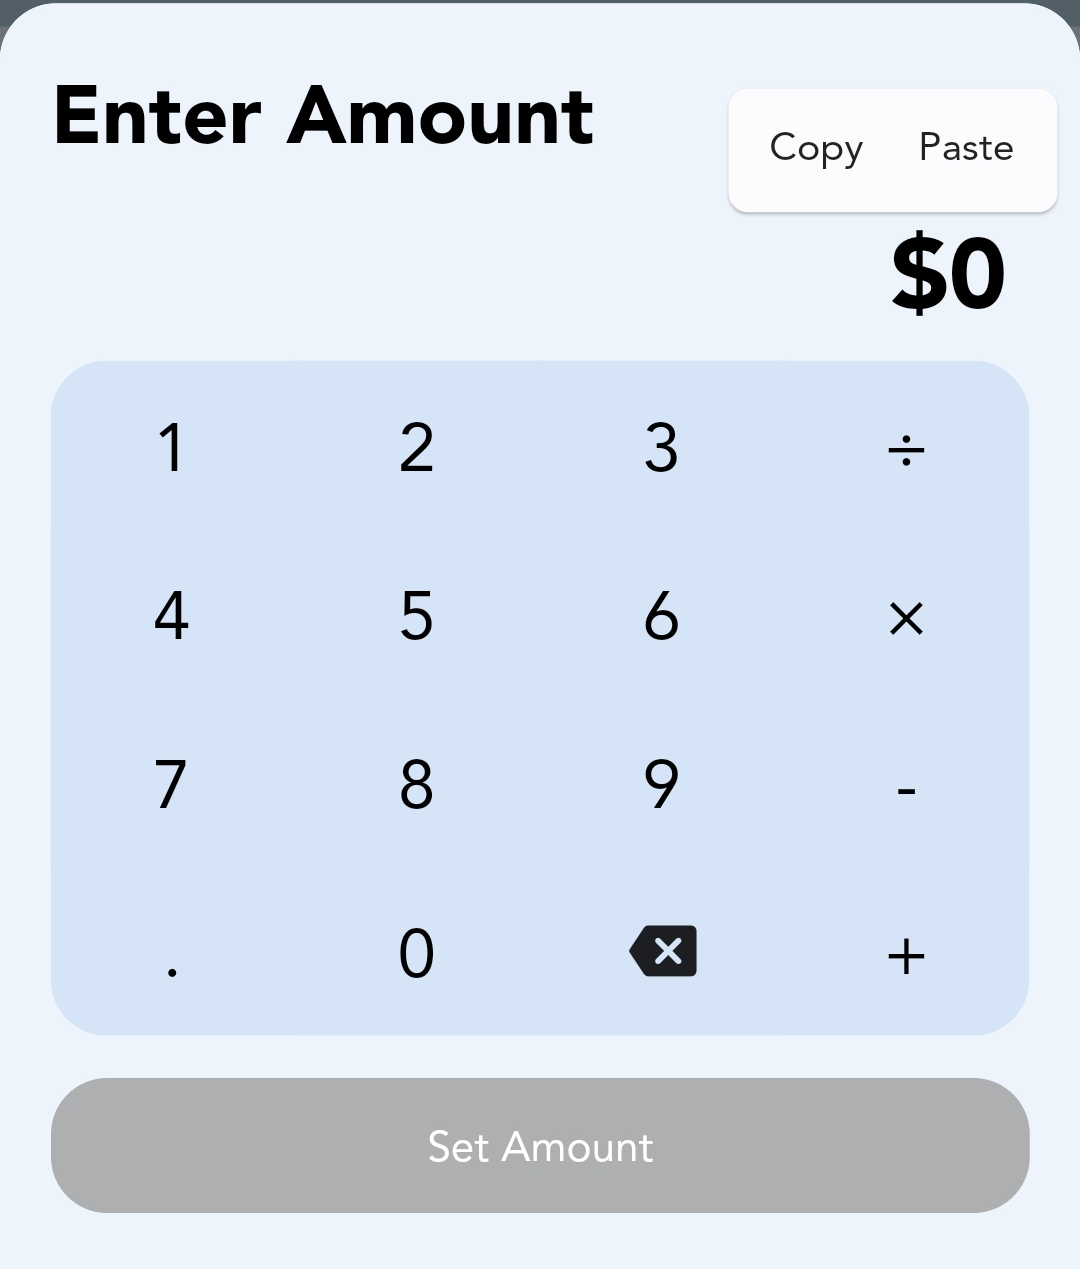
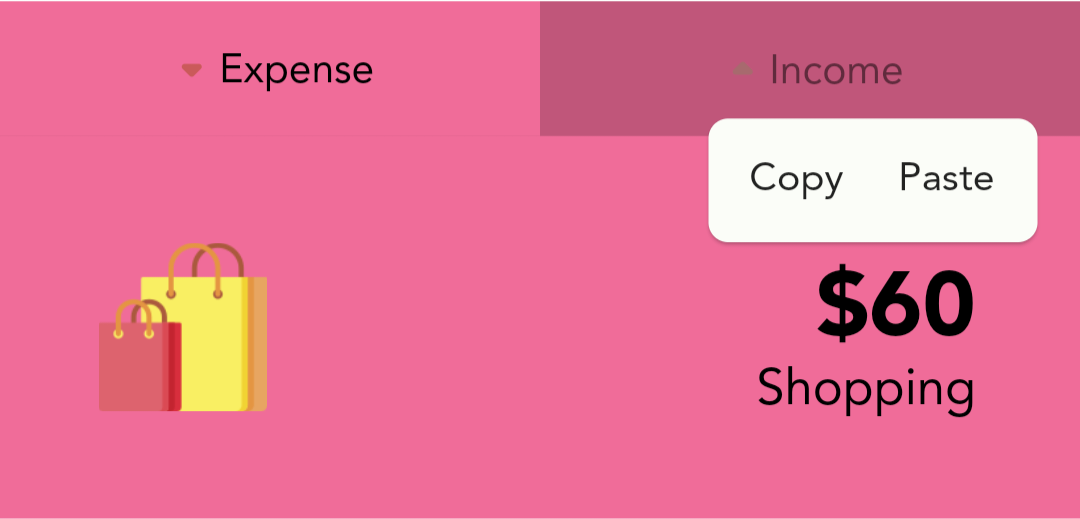
Copy and Paste Amounts
Most amounts within Cashew can be 'long pressed' (a press and hold) to copy the amount. When adding a transaction or entering an amount, you can long press to 'copy' or 'paste' amounts from your clipboard.
Sharing Transaction Details
After selecting multiple transactions with a long press, you can share a breakdown of the selected transaction by tapping the total amount in the dropdown app bar. Alternatively, you can long press the total to copy the transactions breakdown to your clipboard.
Create Transactions Automatically
To create transactions automatically, refer to the Automation section.
Guides
 Quick Start Beginner Guide
Cashew is built to make budgeting feel easy: log spending quickly, then see it show up in your totals and budgets. This quick start guide stays intentionally surface-level. If you want the deeper options, check the full guides below this section.
Quick Definitions
- Account - where money lives (bank, cash, credit card, savings). Every transaction belongs to one account.
- Primary Account - your main account. It's selected by default when adding transactions, and it sets the app's main currency currency used for totals and reports.
- Category - what the transaction is for (Groceries, Rent, Paycheck). Categories power reports and budgets.
- Transaction - one money event (income or expense) with an amount, date, account, and category.
- Budget - a limit (or target) over a time period that helps you track spending and stay on plan.
Step 1: Accounts
- A default account is created for you when you first open Cashew.
- Go to the More tab page, "Edit, Delete, and Reorder Data", and Accounts to manage them.
- Tap an account to edit it (name, currency, color), or tap (+) to create a new one (Bank, Cash, Credit Card, etc.)
- Set your main account as the Primary Account (the starred one). This is the default when adding transactions, and sets the app's main currency for totals.
Using multiple accounts (like Bank + Credit Card) is encouraged. If you move money between them, use a transfer.
Step 2: A Simple Budget
- A default budget may already exist if you entered an initial budget amount during setup.
- Go to the More tab page, "Edit, Delete, and Reorder Data", and Budgets to manage them.
- Tap a budget to edit it (name, amount, color, time period), or tap (+) to create a new one.
- Want more details? See the full budgets guide.
The default budget type (All Transactions) automatically tracks spending (and/or income) by including transactions that match your budget's specifications. You don't need to manually add transactions - it updates itself as you create transactions. To control what transactions are included by default (like categories or accounts), edit the budget and its filters.
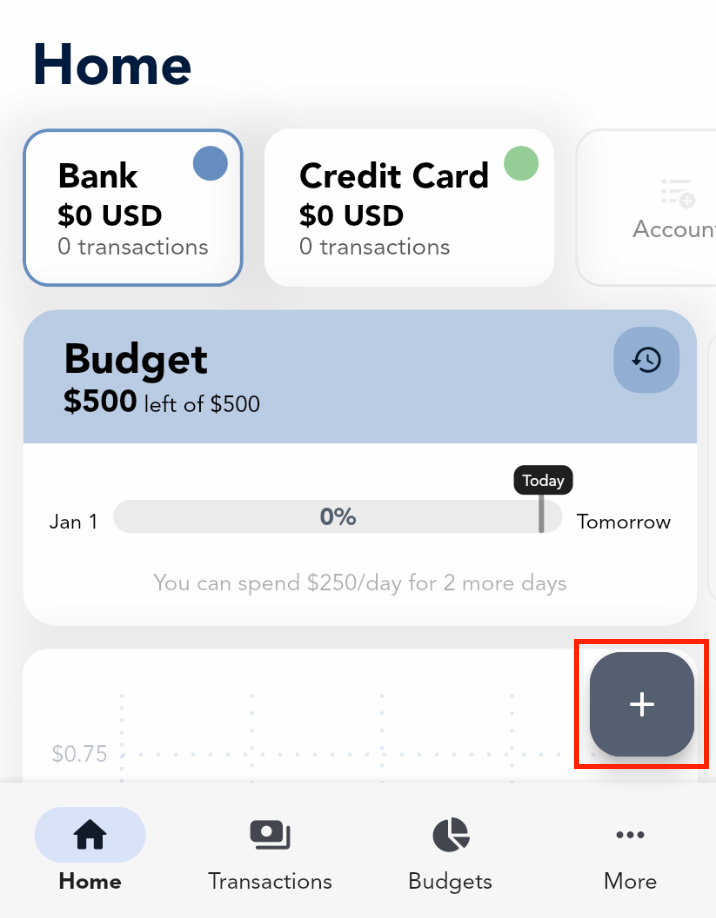
Step 3: Adding transactions
- Tap the (+) button on the main page.
- You will be prompted to enter a Title, to select a Category, and enter an Amount.
- Tap outside to close the sequence of questions at any time and fill in the transaction details manually.
- Create the transaction once completed - your totals and budget numbers update automatically.
Step 4: Budget Insights
- Open your budget to see your transactions counted (as long as they match that budget's filters).
- Check if you're on track using the budget spending graph.
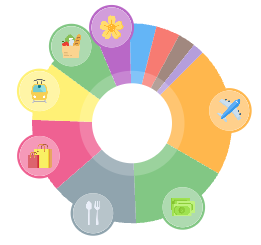
- Use the pie chart to easily identify your biggest spending categories.
- Use the budget history to compare this period with past ones.
As you log transactions, your totals, charts, and budget insights will naturally fill in. Keep up a good habit!
That's the core flow: Account → Transaction → Budget → Insights. If you ever get stuck, the guides below cover everything in detail. Cashew is designed so features reveal themselves as you need them - start simple, and explore the expansive feature set over time.
 Accounts
What is an Account?
An account represents a place where money is stored or spent from (e.g., bank, cash, credit card, savings). All transactions are saved against a single account, and reports/budgets roll up from those account balances. When you need to move money between accounts, use a transfer - see Transferring Funds Between Accounts.
Primary Account & App Currency
The selected account on the homepage, or the starred account on the "Edit Accounts" list page is the Primary Account.
The Primary Account determines:
- The default account selected when creating new transactions.
- The primary currency - totals and reports are shown in this currency.
- The target currency for conversions from other accounts. Amounts of different currencies will be converted to the Primary Account's currency for calculating totals.
To change the app's primary currency, edit the Primary Account and choose a currency. The Primary Account's becomes the application's display currency.
Multiple Currencies
Each account has one currency. Cashew converts all account balances and totals to the Primary Account's currency for summaries and reports. Cashew offers a convenient way to convert other currencies amounts to the Primary Account's currency - see Using Multiple Currencies.
When entering an amount, you can tap the currency conversion button to convert from the selected account into the primary currency in one step. You can also set custom rates in More, "Edit, Delete, and Reorder Data", Accounts, Exchange Rates - see Custom Currencies.
Decimal Precision
Decimal precision controls how many digits you can enter after the decimal point for a given account. The setting is per account and applies when adding or editing transactions in that account. For example: a decimal precision of 5 allows amounts of "1.23456" or "1.234". A decimal precision of 2 allows for amounts of "1.23" or "1.20" or "1.00". A decimal precision of 0 only allows for whole numbers, such as "1" or "2". When displayed, amounts will be rounded to the chosen decimal precision.
Transfers Between Accounts
Use a Transfer to move money between two accounts. Cashew creates a paired set of transactions and excludes them from income/expense totals, keeping reports and account totals accurate . Learn how to create transfers in Transferring Funds Between Accounts.
Tracking Credit Card Accounts
Create a dedicated account per credit card and log purchases to that account. "Pay" the credit card via transfers from your funding account. For the full guide: Tracking Credit Card Spending.
Balance Corrections & Account Totals
If an account's starting balance or running total needs adjustment, use a Balance Correction. This special category affects account totals without counting as income or expense, and is also used behind the scenes for transfers. Read about Balance Corrections: Balance Correction.
Net Worth Account Selection
Choose which accounts are included in the homepage Net Worth (and the time range) by long-pressing the Net Worth section or via Edit Home. See Net Worth Account Selection.
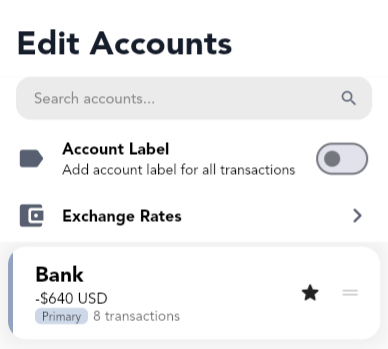
Creating, Editing, Archiving, and Managing Accounts
To create and edit accounts, go to More, "Edit, Delete, and Reorder Data", Accounts. Here, you can create, change the order, and edit or archive an existing item. When they are completed or no longer needed, they can be "archived" - see archiving.
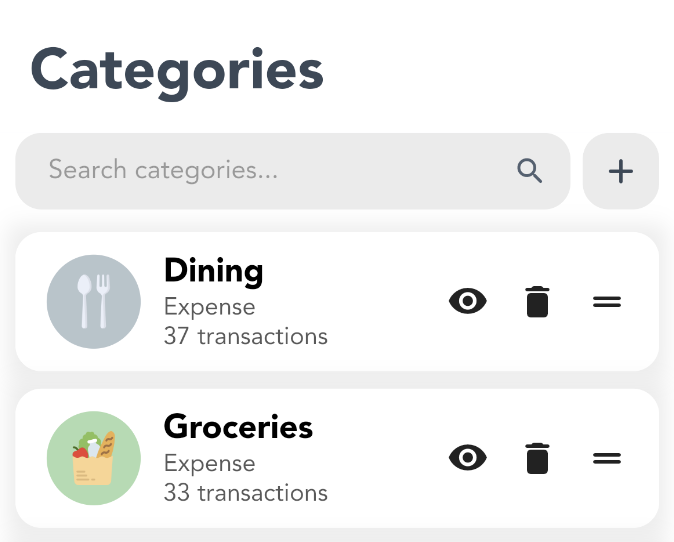
 Categories
What are Categories?
Categories organize your transactions. Every transaction requires a category.
Categories drive reports and budgets by grouping related spending and income. You can use categories to your advantage to set budgets for specific categories - see Category Spending Goals
Expense and Income Categories

When you create a category, you assign it a default Expense or Income. This default is applied automatically when you select the category while adding a transaction. However, after selecting a category when creating a transaction, it can be switched to any Expense/Income type.
For example:
- "Bills & Fees" can include both expenses and earned money
- You can use a "Work" category for work income and work expenses
Subcategories & Organization
Every category can have subcategories for further categorization. You can create a subcategory for a main category on the Edit Category page. Statistic totals are further segmented and provide more insight when transactions are classified under subcategories.
Special Case: Balance Correction
The Balance Correction category is a special category used by transfers and manual balance fixes. It affects account totals without being counted as income/expense in reports - see Balance Correction.
Creating, Editing, Archiving, and Managing Categories
To create and edit categories, go to More, "Edit, Delete, and Reorder Data", Categories. Here, you can create, change the order, and edit or archive an existing item. When they are completed or no longer needed, they can be "archived" - see archiving.
 Budgets
What is a Budget?
A budget is a financial plan that outlines expected income or expenses over a specific period of time. It helps manage money by setting limits on spending, tracking financial goals, and ensuring that resources are used effectively. It allows the balance of what comes in with what goes out. Tracking finances over a period of time and analyzing the insights can produce a clearer understanding of spending habits, highlight areas for saving, and support smarter financial decision-making.
Cashew is a budget tracking application after all, so let's take a deep dive into learning how to create and manage a budget within Cashew in detail.
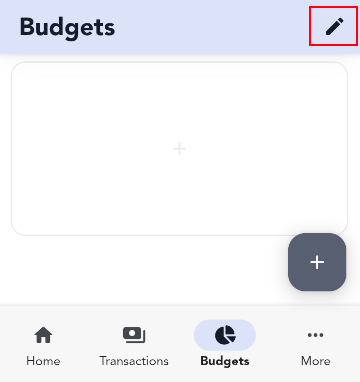
Creating a Budget
To create a budget, first open the Budgets page. Head to More, "Edit, Delete, and Reorder Data", Budgets, and tap the (+) button.
Budget Types
There are two types of budgets in Cashew: Added Only budget and an All Transactions budget. This cannot be changed after the budget is created. However, you can create multiple budgets within Cashew.
Added Only Budget:
- Only the transactions you add
- Useful for one-time budgets with custom time periods
- Example: 'Vacation' budget
All Transactions Budget:
- All transactions that satisfy the set categories and filters will automatically be included
- Useful for long-term budgets over multiple periods
- Example: 'Monthly Spending' budget

General Budget Parameters
You can select if you want to budget for savings (positive cash flow, such as income) or budget for negative cash flow, such as expenses. Each budget has a name, color, amount/limit/target, and the start day and period which outlines the cycle.
Cycles and Time Periods
The cycle of a budget will always repeat and reset its cycle (unless the budget type is set to Custom). Past budget periods can be viewed once the cycle has elapsed by viewing the budget History. If you want a monthly repetitive budget to start on the 21st of the month, select any date with the day of the 21 (e.g., September 21) and [ / 1 month ] as the time frame. Cashew will use the current period based on the current date from the start date you set.
To set a Custom time period for a budget, change the time frame from the default [ month] to [ custom ]. Custom time periods do not repeat. If you want full control over each budget time period and budget amount, use multiple custom time period budgets.
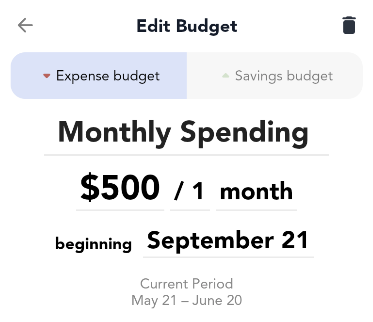
To set the period, you can choose a custom budget period (a time range between 2 dates) or an automatically recurring cycle, such as every 2 weeks, or every month.
"All Transactions" Budget Filters
For an all transactions budget, you can select the transactions to automatically include. For example, if you would like to include income in an expense budget (which will decrease the total spend, since the opposite polarity of transactions are included), you can select Income under Transactions to Include. Tap the (i) to read about each Transactions to Include filter. You can also select which categories to include or exclude from an all transactions budget, along with which accounts of transactions to be included.
Excluding Transactions From "All Transactions" Budget
Each transaction can also be manually excluded from an all transactions budget. To do this, edit the transaction of interest, scroll down, tap More Options, and select the budget you would like to exclude this transaction from.
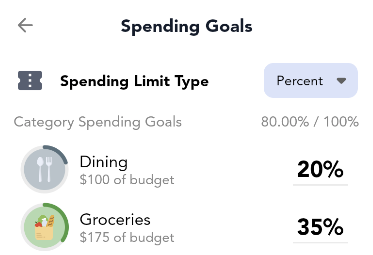
Setting Up Category Spending Goals
Once you create a budget, you can set up smaller 'sub-budgets' or, as Cashew calls them, Category Spending Goals to break down your spending for each category within an overall budget.
To add category spending goals, edit the budget and tap Set Category Spending Goals. Here you can set a percentage goal (percentage of the budget total) for each category or an absolute spending goal (actual amount of money). You can also apply these goals to subcategories and main categories. By long-pressing a category entry in the budget spending overview page below the pie chart, you can quickly modify the category spending goal to suit your spending needs.
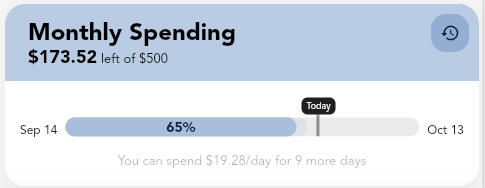
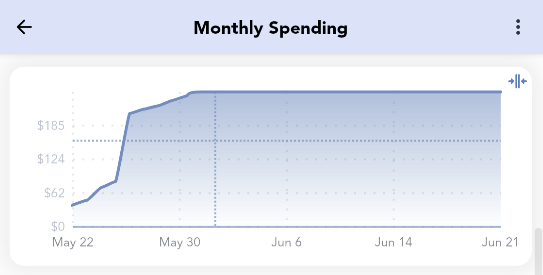
Reading a Budget Graph
Cashew adds useful indicators to help you track your spending trajectory. Within a budget spending breakdown, you will see a line graph showing the amount spent versus date through the budget period.
A dashed line is drawn on the current date and the average amount spent per day up to the current day. The intersection indicates where your spending should be at that given time for a budget to stay on track.
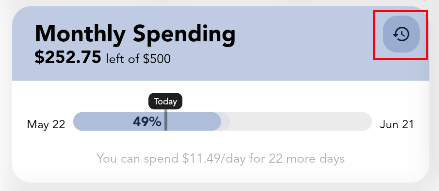
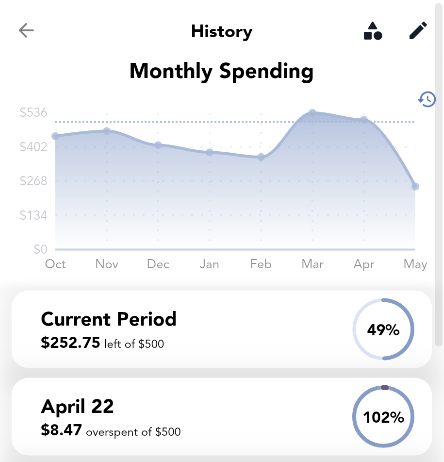
Viewing Past Budget Periods
You can tap the history icon to see past budget period breakdowns. You can only view the history of non-custom period budgets, since custom time period budgets do not repeat their cycle.
Separate Budget Amount per Period
A budget can only have one set target and it applies to all periods. You can change the budget amount at any time, it will just apply to previous periods as well. This is to encourage stable and healthy spending habits. However, Cashew still allows you to have full control of each time period if you wish.
If you want to individually track each period, you can create multiple custom time period budgets - each with a separate budget amount for the specified custom time period. You can archive old periods that no longer apply. To easily make a copy of a custom time period budget, edit an existing custom time period budget and tapping the "copy" button in the top right corner. This allows you to quickly customize a copy for a new period.
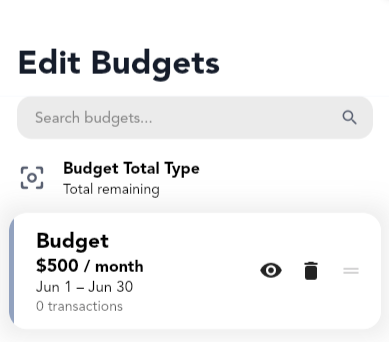
Creating, Editing, Archiving, and Managing Budgets
To create and edit budgets, go to More, "Edit, Delete, and Reorder Data", Budgets. Here, you can create, change the order, and edit or archive an existing item. When they are completed or no longer needed, they can be "archived" - see archiving.
 Goals
Goals
What is a Goal?
A goal tracks progress toward a target amount (saving up or paying down). You add contributions as transactions, and Cashew totals the cash flow assigned to that goal to show how close you are to the target.
How Goal Progress Is Calculated
Goal progress is the sum of transactions assigned to the goal compared against its target amount. Assign any transaction to a goal when creating or editing it. You can contribute from any account; totals are converted to the app's Primary Account's currency for consistency - see Primary Account for more information.
Savings And Expense Goals
Choose a goal type that matches the direction of cash flow you're tracking:
- Income Goal - Positive cash flow toward a target you're accumulating (e.g., Emergency Fund, Vacation). Contributions are income transactions increase progress toward the target.
- Expense Goal - Negative cash flow toward reducing something you owe (e.g., Paying down a balance or planned outlay). Contributions are expense transactions and increase progress toward the target.
Contributing to a Goal
When adding or editing a transaction, assign it to the goal by selecting the goal in the Add/Edit Transaction page.
Automate recurring contributions with repetitive/upcoming transactions - see Future Repetitive Transactions and Automatic Payments.
To transfer an amount from accounts to a goal, see Transferring Funds to Goals.
Tracking Without Affecting Main Account Balances
If you want goal contributions to not change your everyday account balances, create a dedicated separate "tracking" account and post goal-contribution transactions there. This keeps operational balances untouched while still recording goal progress. See: Add to a Goal Without Affecting Account Balance.
Transfer transactions can also be added to goals. Pair goals with transfers to reflect real money movements between funding and destination accounts.
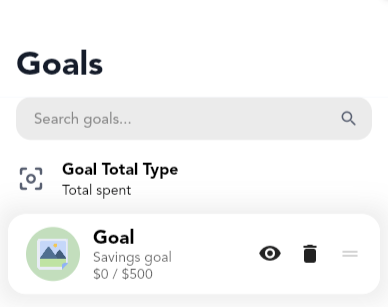
Creating, Editing, Archiving, and Managing Goals
To create and edit goals, go to More, "Edit, Delete, and Reorder Data", Goals. Here, you can create, change the order, and edit or archive an existing item. When they are completed or no longer needed, they can be "archived" - see archiving.
 Loans
Loans
Loans help you track when money is lent or borrowed and therefore track owed money. There are 2 types of loans in Cashew. One-time loans and long-term loans. Loans can be managed on the More, "Edit, Delete, and Reorder Data", Loans page within Cashew.
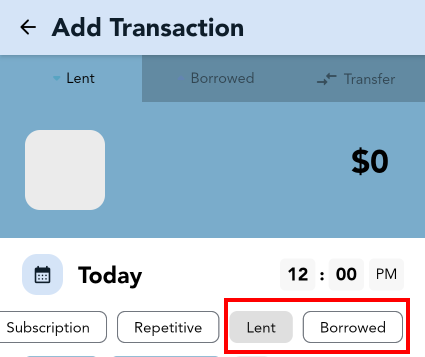
One-Time Loans
One-time loans are set by changing the transaction type. These loan transactions can only be collected to the same account. A "lent" transaction is a negative cash flow until marked as "collected". This emulates receiving money (positive) until marked as collected, resulting in a net 0. A "borrowed" transaction is positive cash flow until marked as "settled". This emulates giving out money (negative) until marked as settled/received, resulting in a net 0.
Long-Term Loans
Long-term loans are more complicated than one-time loans, but support collection/settlement with different accounts across multiple transactions. Essentially, a long-term loan is a collection of transactions, displaying the difference. Long-term loan totals can change dynamically. When the net is 0 of all transactions included in a long-term loan, it is considered "settled/collected/paid off". Add transactions to a long-term loan to keep track of the loan total and payments.
Since a long-term loan is a collection of transactions, each transaction can belong to a different account - therefore supporting collections/settlements with different accounts.
To increase the long-term loan amount, add a transaction of the same polarity. For "Lent" loans, increase the loan amount by adding a "Paid" (negative) transaction. For "Borrowed" loans, increase the loan amount by adding a "Collected" (positive) transaction.
To add progress towards a loan, add a transaction with the opposite polarity. For "Lent" loans, decrease the loan amount by adding a "Collected" (positive) transaction. For "Borrowed" loans, increase the loan amount by adding a "Paid" (negative) transaction.
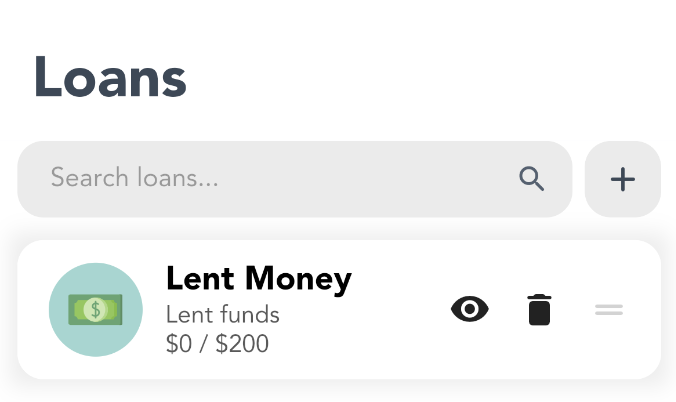
Example Long-Term Loan
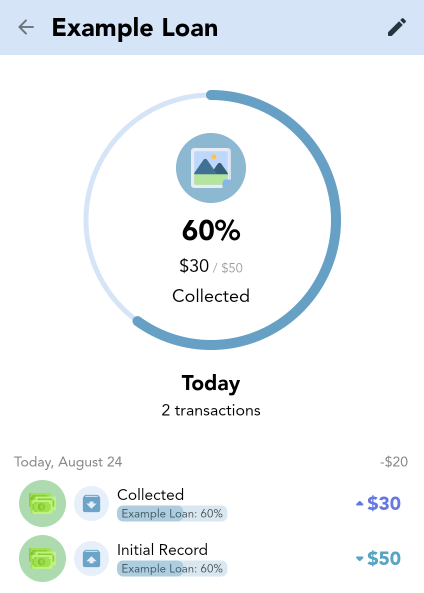
For example, if you create a long-term loan of type "lent" of 50$. This will create the initial lent out "Paid" transaction of amount 50$. Then add a "Collected" transaction manually with amount of 20$. This will result in the net total being 30$ - and therefore 30$ left to be collected, displayed in the interface.
Note that the "Paid" and the "Collected" transaction can be have a different account, allowing you to separate the totals across multiple different accounts.
Say in this example, the long-term loan amount total needs to be increased to 60$ from 50$. Manually add a new "Paid" transaction to this long-term loan of amount 10$ and the total left to collect will increase by 10$. This results in the long-term loan totalling 60$.
If the type of long-term loan is switched to "Borrowed" instead of lent, the opposite polarity of transactions will be used to calculate the total.
Creating, Editing, Archiving, and Managing Long-Term Loans
To create and edit long-term loans, go to More, "Edit, Delete, and Reorder Data", Loans. Here, you can create, change the order, and edit or archive an existing item. When they are completed or no longer needed, they can be "archived" - see archiving.
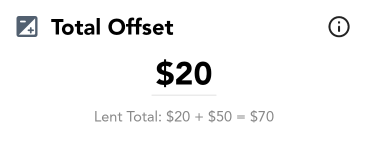
Tip: In a long-term loan, you can also change the "Total Offset". The total offset will not count as a transaction, but will add to the total of the loan by some offset set. This is useful if you need to modify the total of the loan without adding a transaction affecting the net totals, for example to increase the loan amount due to interest or other unaccounted for costs modifying the total owed/lent out.
 Balance Correction
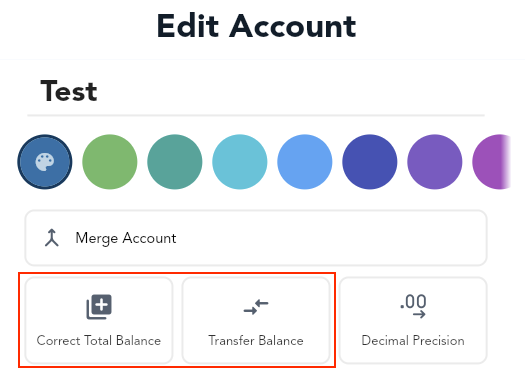
A "balance correction" within Cashew is a powerful special type of transaction. It is a transaction that is not globally categorized by Cashew as Income or Expense. By default, this special category does not exist - to let Cashew create it, edit an account and perform a Transfer or Correct Total Balance.
Once it is created, it can be edited by the user and will still maintain its properties. The balance correction category has the following details:
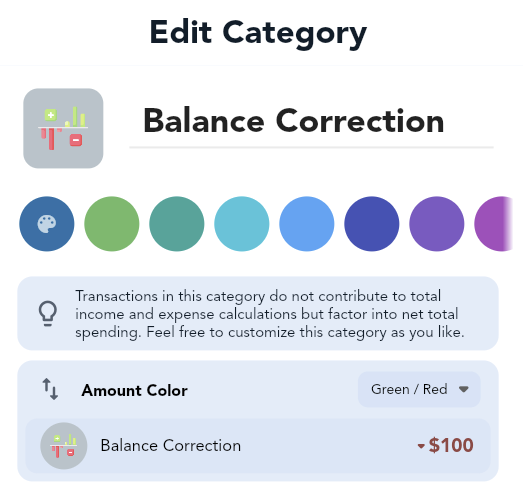
Uses of the Balance Correction
The balance correction category is primarily used in Cashew for Transfers and Balance Corrections of accounts - since these operations are not directly related to income or expenses. However, this category can manually be used to track refunds/returns/payments etc. - or transactions that would not be otherwise categorized as an income or expense directly.
Balance corrections also allow users to track credit card accounts and payments without affecting incoming or outgoing totals produced by categorized income and expense transactions. See: Tracking Credit Card Spending with Cashew.
 Using Multiple Currencies
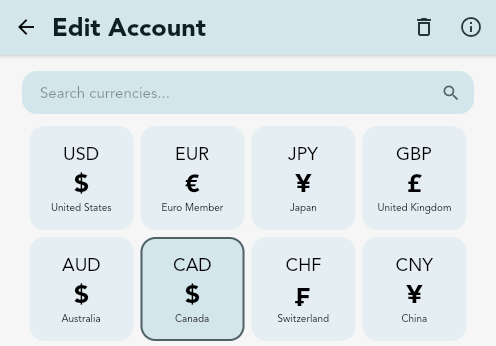
Cashew only supports one currency per account. You can change the currency by editing an account.
To change the primary account's currency by heading to More, "Edit, Delete, and Reorder Data", Accounts; the starred account represents the primary account and selected currency of the application. Cashew will convert all currencies to this account.
However, if you need to enter a different currency with automatic conversion into another account, you can use the currency conversion button when entering an amount.
Make sure the primary account is selected to the currency you want to convert to. Then, select another account when entering an amount, and convert the amount back to the primary account with one tap.
In the example below, 'Bank (USD)' is our primary account, and we want to convert 50 EUR to USD using the conversion rate. We can do this by selecting 'Other (EUR)' and tapping the conversion button.
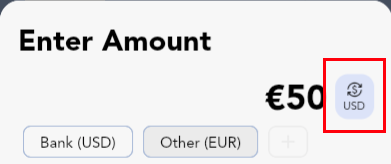
Using the currency conversion button will allow you to store the converted currency using the conversion rate at the current point in time, and to the target account's currency rate. Therefore if the currency rate changes, the converted amount will not since it has already been converted and stored in the transaction at that point in time.
Custom Currencies
You can customize the currency conversion rates by heading to More, "Edit, Delete, and Reorder Data", Accounts, Exchange Rates. If a custom currency is not set, exchange rates are used and updated daily from https://github.com/fawazahmed0/exchange-api.
 Importing CSV / Excel / External Data
You can import a CSV (Excel) file list of transactions into Cashew. You can import data in Cashew by heading to More, Settings & Customization, Import & Export Data.
To import external data into Cashew from other applications you will need to be able to extract data that can be manipulated into a CSV file Cashew understands. To do this use the provided import templates:
Utilize Provided Templates
Use the provided CSV templates within the app for importing data. You may need to copy your data using Sheets or Excel into the template from an existing CSV file to the respective columns (especially if migrating from another application) to ensure the template format is used. This ensures a unified format that Cashew can understand. Extra information below is provided on specific formatting of certain types of data.
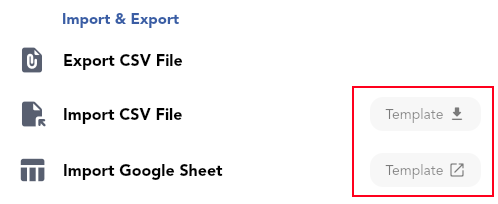
To use the Google Sheet template, please make a copy before adding your transaction data. Follow this guide on how to make a copy of a Google Sheet.

Choose Import Method
You can import data in two ways:
CSV File
Import a local CSV file by selecting Import CSV File in the import section and selecting the file on your device. A popup will prompt you to select the corresponding columns so that data is properly mapped to the corresponding fields of a transaction.
Google Sheet
Import data from a Google Sheet by pasting the shared URL to that Google Sheet. Ensure that the Google Sheet has sharing permissions as Anyone with the link... "Viewer", otherwise Cashew cannot read the contents. A popup will prompt you to select the corresponding columns so that data is properly mapped to the corresponding fields of a transaction.
Note: An import cannot be undone. Make sure to keep a backup of your data to revert an import. See: Cloud and Local Backups
Extra Importing Details and CSV Format
Income / Expenses
When importing income, use a positive amount; for expenses, use a negative amount.
Date Parsing
Cashew will attempt date parsing in various formats, but the official CSV format for dates provided in the templates is recommended for accuracy.
Importing Subcategories
The corresponding subcategories must exist in Cashew before the import occurs. If there is an existing subcategory, Cashew will prioritize that subcategory over creating a default category with that name when importing. Therefore, subcategories can be imported using the 'category' column.
Note: As an alternative, after importing, missing categories will automatically be created as main categories. These main categories can be converted into subcategories: edit the category, and select "Convert Into Subcategory".
Importing Transfer Transactions
To import transfers, your export source (original application) needs to be able to convert transfer transactions into single income/expense transactions. A single transfer would consist of 2 transactions, an outgoing account and incoming account transaction. This would be the universal format. Once this is done, Cashew can import the transactions. These imported transfer transactions should be under one 'category'. Now merge these transactions with Merge Category into the Balance Correction category within Cashew.
Note: the 'Balance Correction' category may not exist. It is automatically created when at least one transfer or balance correction is made within Cashew. So if it is missing, create a transfer or balance correction on an account.
 Home Page Customization
Cashew's Home page is fully customizable. Choose which sections to display (graphs, budgets, balances, heatmaps, pie charts, recent transactions, etc.), and control their order and visibility.
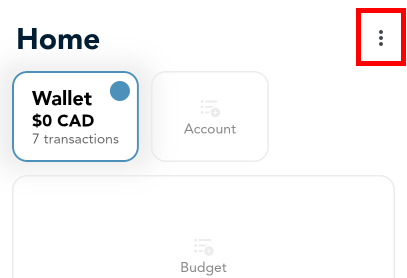
To edit the home page: on the Home page, tap the three-dot menu in the upper-right corner, and press Edit.
Tip: You can hide the home page completely by customizing the bottom navigation bar tab pages.
Customizing the Layout & Visibility
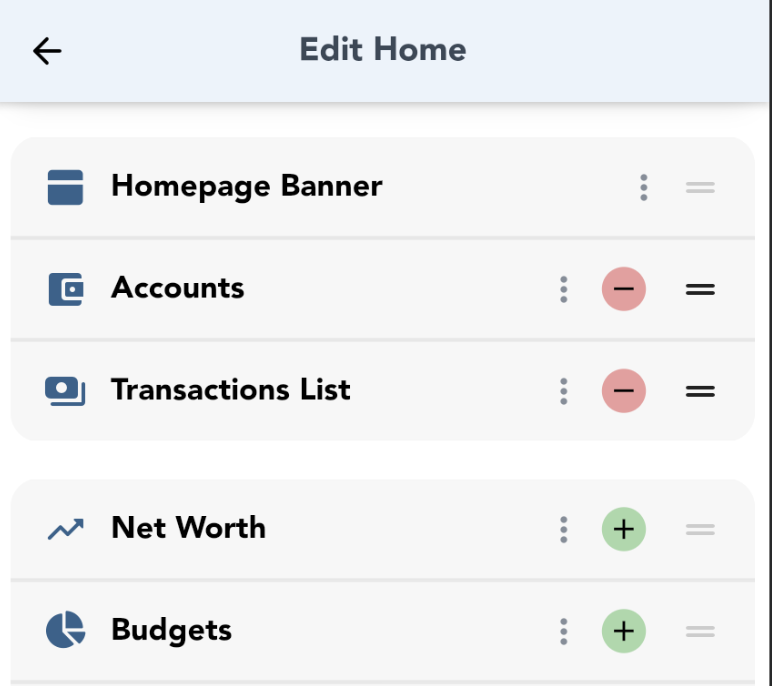
To edit the home page:
- You can "long-press" to drag and drop to rearrange enabled homepage sections.
- Tap the (+) of a disabled section to enable it. Tap the (-) of an enabled section to hide it.
Section Options
Tap any enabled section on the Edit Home page to configure its settings. Alternatively, long-press a section directly on the Home page itself can open the same menu.
Net Worth / Statistics Account Selection
To select the accounts included for the Net Worth calculation: open the Edit Home page, and select the Net Worth section. Here you can select which accounts to be included in the Net Worth calculation and the calculation's time range. By default, all accounts are included.
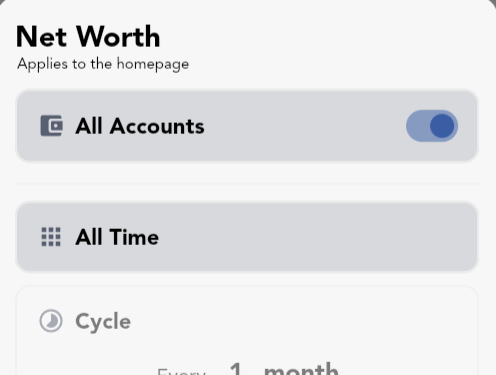
In addition to the Net Worth, most statistic based home page sections support an account selection.
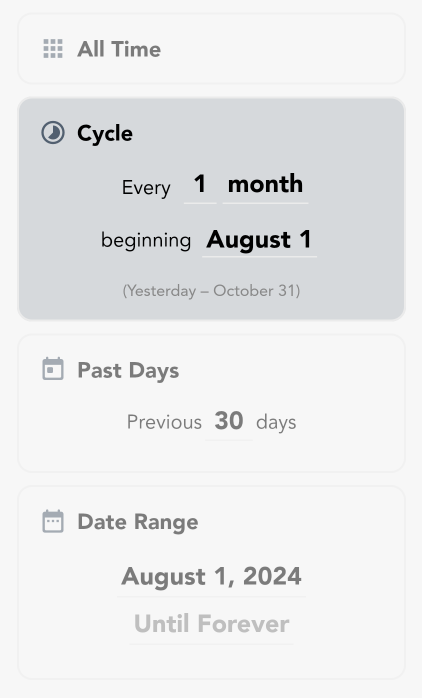
Statistics Date Range
Most statistic home page sections support a custom date range. On the Edit Home page, tap the section and set its date range.
Primary Account
In account list sections on the Home page, the selected account is the Primary Account. You can quickly switch the Primary Account by selecting it in the account list. This account is the default for new transactions and defines the app's base currency - see Primary Account.
 Pinned Transactions
Pinned transactions allow you to quickly duplicate an existing transaction to the current date and time. They allow the creation of frequently used entries with just a single tap, saving time on repetitive inputs (For example, transit fares or regular coffee purchases).
Setup Pinned Transactions
To setup pinned transactions:
- Open the Pin Transactions page: long press the (+) button and tap the "Pinned Transactions" icon in the Transactions section
- Add a new pinned transaction by tapping (+) under the Pinned Transactions list and select the transaction you would like to pin.
- Observe the transaction is now added to the list.
- Navigate back to the home page and long press the (+) button.
- Tap the pinned transaction in the Transaction section to quickly duplicate it to the current time.
You can customize the behavior of duplication for pinned transactions, such as opening the full Edit Transaction page with prefilled transaction details before it is added to Cashew. You can also customize the style of the pinned transactions that will be displayed.
 Cloud and Local Backups
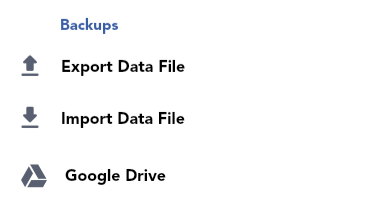
Cashew offers 2 methods of backups: Google Drive Cloud Backups and Local Data File Backups. To create/import backups head to More, Settings & Customization, Import & Export Data.
A Cashew backup file is a direct copy of the current app's database. It captures all data at that point in time, containing all budget data, transaction data, application settings etc. The database can be opened with an external SQL viewer tool. Please be advised if the backup file is tampered with, it may not be able to be successfully imported back into Cashew.
Note: Keeping periodic backups keeps your data safe in the case of a corrupted file, accidental deletion, or if you need to restore your information on a new device.
Note: Restoring a backup will always overwrite all current data on target device. Before overwriting data, it is always recommended to keep an extra backup.
Note: Exporting and Importing CSV files as backups is NOT recommended. Cashew does not export all app data nor does it import all app data when using CSV Importing and Exporting. For example, app settings are not exported to the CSV.
Local Backups
To create a local backup, head to More, Settings & Customization, Import & Export Data, under the 'Backups' section, tap Export Cashew Data File and choose a location to save the backup file. Backups can be restored at any time.
To restore a local backup, head to More, Settings & Customization, Import & Export Data, under the 'Backups' section, tap Import Cashew Data File and choose the backup file.
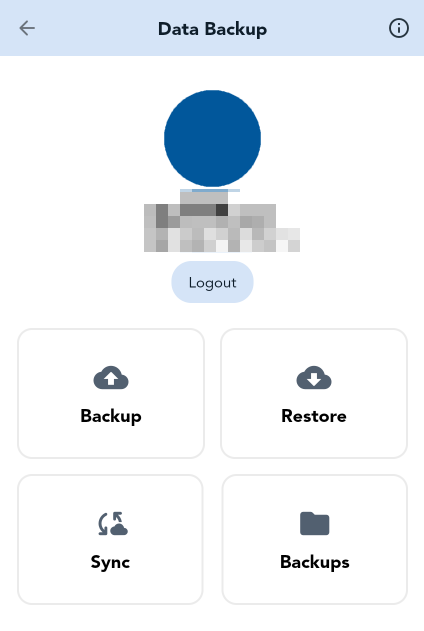
Cloud Backups
Cloud backups can be enabled by linking a Google Drive Account to Cashew. To login, go to More and tap Login/Google Drive. Once logged in, you can create a cloud backup, restore a cloud backup, manage device sync data, and manage cloud backup files. Cloud backups can also be downloaded and saved to the device as a local backup to be restored at any time.
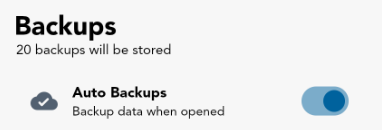
By default, only the latest 20 backups are stored on your Google Drive, with the oldest being deleted automatically. Each backup file is small and usually under 3 mb (0.003 GB) each.
Automatic cloud backups are enabled by default and will create periodic backups on login. You must be logged in for Cashew to create these automatic backups.
Note: All cloud backups are stored on your Google Account and the Cashew development team does not have access to any of this information - see Privacy Policy.
Cloud Syncing
Your personal Google Drive is used to support syncing data between multiple devices. Each device needs to upload changes before they can be downloaded to another device. Therefore, you will need to first sync from one device to upload changes, and then sync on the target to download changes. This eliminates the need for a centralized server and ensures your data is not shared with us or any third party.
See Syncing Troubleshooting for more information.
Google Drive Permissions
Since cloud backups require Google Drive, you must provide Cashew permission to create and manage its own application data on your Google Drive. If this permission is revoked, you may receive Error 403: Request had insufficient authentication scopes. To enable permissions, re-login to the Cashew app account page and you will be prompted to enable permissions. Alternatively, see this guide.
For cloud backups, Cashew uses an application data folder inside your Google Drive and does not have access to any other files. The application data folder is a special hidden folder that Cashew uses to store application-specific data and backups.
Accessing Cashew's Google Drive Cloud Data
Any connected app data is not available to be viewed by users using Google Drive directly. This is to ensure app data does not get tampered with and is a limitation imposed by Google. You can only remove all your app data through Google Drive management, not view it. If you need to download a backup stored on your drive, Cashew allows you to download these backups within the app itself.
Deleting Cashew's Google Drive Cloud Data
See Deleting Cashew's Google Drive Cloud Data.
Changing the Google Account for Cloud Backups
If you need to use a different Google account for cloud backups, open the Login/Google Drive page to access the account cloud backup page. From there, tap logout, and then log back in by opening the Login/Google Drive page again. When signing in again after logging out, you will be prompted to select which Google account to use.
Note: Logging out only disconnects Cashew from Google Drive. Your current app data will not be cleared when you log out.
Because your data remains on the device after logging out, logging in with a different Google account will allow you to continue using your existing Cashew data while storing future cloud backups and sync data under the newly signed-in Google account.
If you want to remove cloud backup/app data that was stored under the previous Google account, see Deleting Cashew's Google Drive Cloud Data.
Note: The Google account logged in for cloud backups is not necessarily the same account associated with your Cashew Pro purchase. See how your Cashew Pro license is handled.
 Deleting All Data
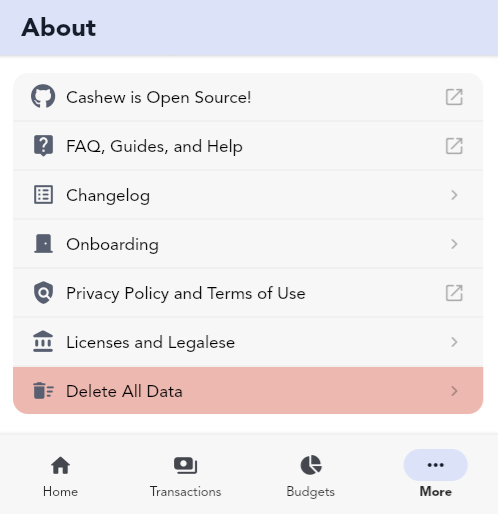
To delete all data in the app, go to More, About Cashew, and scroll down to find Delete All Data.
This process will also prompt you to delete sync/backup data that could be stored on the cloud.
After logging in again, Cashew will attempt to restore any existing cloud sync data linked to your account. If you do not want your sync data to be restored, you will need to delete it. See this guide on how to prevent sync data from being restored.
Deleting Cashew's Google Drive Cloud Data
Google Drive is used by Cashew to store sync data and cloud backups. This data is stored and connected to your personal Google account - the Cashew development team does not have access to this data, and therefore it will need to be deleted manually by the user.
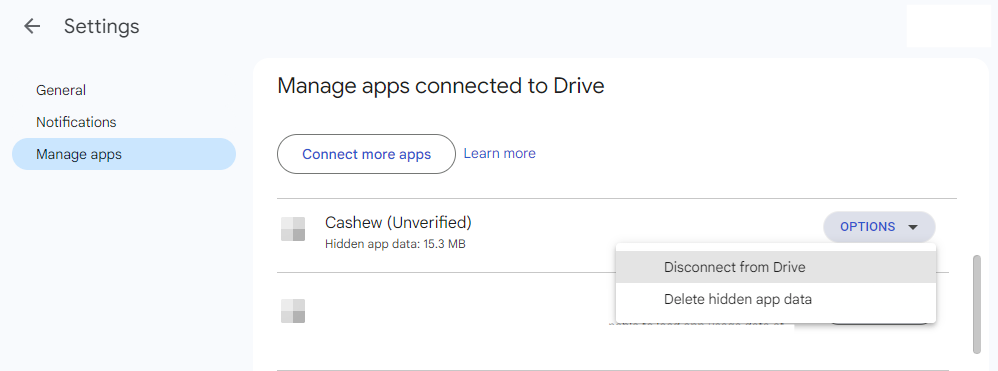
To delete all hidden Cashew sync and backup data through Google Drive:
- First note this will delete ALL cloud backups before proceeding.
- Open a web browser (NOT the application or mobile website) and visit https://drive.google.com/drive/u/0/settings while logged in to the Google account you use with Cashew.
- Go to the Manage Apps tab.
- Locate 'Cashew'.
- Click on Options.
- Select Delete hidden app data.
Automation
App Links Android, iOS, Web
Add transactions by tapping a custom Cashew URL
Siri Shortcuts iOS
Add transactions by using Apple Pay
Notification (and SMS) Scanning Android, iOS
Add a transaction from another app's notification / SMS message
Broadcast Receiver Android
Add a transaction while the app is in the background
Mailbox Android, iOS, Web
Import / export transactions to / from an external Google Sheet
Intelligence Android, iOS, Web
Add transactions with artificial intelligence
Questions? Feel free to reach out on email: dapperappdeveloper@gmail.com